Project
Starting the Project
- How to select a project
- Form a group of 3-4 students and choose your own topic
- Project marking guide
- Project Difficulty / Quality Rubric; letter grades are approximate.
Project Dates Spring 2025
- Feb 13 (Thur): Project Proposal [Updated]
- Mar 6 (Thur): Milestone 1
- Mar 27 (Thur): Milestone 2
- Apr 9 (Wed): Demo day (SRYE atrium)
- Apr 10 (Thur): Project Submission = Write up, Code, How-To-Guide
- Apr 10 (Thur): Individual Peer Evaluation
[0] Project Proposal
- Describe what you have in mind. Do some research and start on the first steps. Even if your proposal is not accepted as is, it likely will be after a revision, so don't wait to get started!
- You may later change your project. This is just a plan; you will not be marked for hitting this plan.
- Length: 1.5 pages; may be longer if adding figures.
- Proposal Sections
- Group Information
- Group name & members (names and SFU email's).
- Note: Create your group in CourSys when submitting.
- Topic description (1-2 paragraphs):
- What will your system do, and how? Add a diagram.
- Describe connections to any external systems.
- Any required additional hardware (students must provide). If using special hardware, include mention of its Linux support (drivers, libraries, guides...).
- Time-line/Project plan (~10 lines):
- For each of the two Milestones, estimate which features will be working by then. You won't be marked on hitting all these points, but it gives us a place to start discussing how it's going.
- Put some thought into what tasks are required and break down the project into manageable stages. Think of the most basic set of features, and what is needed to get this working. Focus your efforts on getting something working, and then add to it little by little.
- Hint: Work on the hard parts first, such as interfacing with hardware or external systems.
- What is the minimal configuration that will let your system work?
- For each of the two Milestones, estimate which features will be working by then. You won't be marked on hitting all these points, but it gives us a place to start discussing how it's going.
- Group Information
- Submit on CourSys; due date above. Submit early and email Dr. Brian for faster feedback.
- If interested in any of the hardware I have to lend, email me and I'll figure out who gets what shortly after the proposal is due. Here are good sites to find hardware (consider Grove hardware for easy connectivity) (ensure parts are 3V, not 5V!):
- AdaFruit
- RobotShop
- DigiKey
- RP Electronics (local)
- Lee's Electronics (local)
- Seeeds Studio
- Proposal is not worth any marks, but it's where I'll give you feedback on your idea and its level of difficulty. Putting good thought into it will help you pick a better project and hit the ground running.
- Proposal marking guide (sort of).
[2] Milestone 1
- Submit a 1/2 page report covering:
- 2 sentence description of your project (to refresh my memory of your project).
- What has been accomplished so far?
- What has fallen behind?
- Briefly mention any expected project changes from your project proposal.
- Must have some progress to earn these marks!
[8] Milestone 2
- Submit a report containing covering:
- 2 sentence description of your project (to refresh my memory of your project).
- Discussion of significant accomplishments (~0.5 to 2.0 pages). Three points must have proof submitted showing the accomplishment (see below). For each of these proofs, describe what is being shown in the "proof" and how it demonstrate the accomplishment. You can include the "proof" in the document or add it to the ZIP file you are submitting.
- Discussion of any roadblocks or unexpected challenges (<0.5 page).
- Discussion of significant differences between what has been accomplished and the plan in your project proposal (<0.5 page).
- Proof of accomplishments:
- Pick the three best accomplishments so far and submit some from or proof to show their state.
- Many things acceptable for "proof" such as: screen shot, photo of something in operation, text-capture of application running, directory listing of cross-compiled library, etc. For videos, please upload to YouTube (or the like) and include a link in your write up.
- Each of these "proofs" must be referenced and explained in your document, as described above.
- Must have good progress to earn these marks!
[10] How-To Guide
- Group submits a step-by-step guide explaining one interesting task/topic/aspect you figured out for your project.
- Examples:
- How to connect a USB camera to the board, compile & install drivers, and use it via a simple C program.
- How to smoothly display video on an LCD.
- How to write a driver to control an external IO board over I2C.
- How to download, cross-compile, and install/use some useful tool/library.
- How to cleanly interface to a library or tool.
- Should be 3-5 pages long.
May be longer if includes many screen-shots. - Should guide the reader through the task.
- Marked based on topic choice (must be non-trivial) and quality of explanation.
- Must be a step-by-step guide.
- Include screen shots, and sample output as required/reasonable.
- May assume only what the average CMPT433 student might know.
- Cannot replicate any guides provided by the instructor.
- May not plagiarize online guides.
It's OK to cite other guides, but your guide must be your own work. - Include troubleshooting steps to cover some likely errors.
- Must be clearly written and easy to follow.
- Must give copyright permission to the instructor for your guide to be posted online for future students to access. You retain copyright.
- May be submitted as an HTML or PDF document. Include sample code in the submitted zip file. Submit via CourSys.
- Must not include SFU student numbers! Will be posted online.
- How-To guide marking guide.
Demo
- Demo session to be held in SEE building's Atrium (same building as lecture).
- Time: 11am - 5pm; with ~8 minutes for instructor to view your demo.
- Print a ~1 page sign, with words visible from 3 feet away, stating:
- Project title
- Optional to have a poster showing your project architecture/purpose/...
- Demo your embedded system (~5 min).
- You may want a sign showing block diagrams to quickly show how your system works.
- Instructor will ask questions about the system to help evaluate the difficulty and quality of the product.
- Marked for overall quality of demo and the product you created.
- Each group should have at least one group member present for 2 hours of the demo.. (Special arrangements possible with Dr. Brian if not possible).
- Bring your own power-bars and possibly an extension cord. There are power-plugs near each demo space. Pick any free space and be setup for start of demo time.
- It will be 2 groups per table!
- Demo marking guide
[100] Project
- Project is evaluated during the demo, by reading the Project Writeup, and by viewing the code.
- Demo marking guide
- Project and Write-up Marking Guide contain more details.
- Project Difficulty / Quality Rubric; letter grades are approximate.
-
Project Write up (3-5 pages):
-
System Explanation: (~1 page) What does your system do? How does it do it? Include screen shots, pictures, and diagrams where possible. State important things not working well (such as video streaming at .5 FPS, or bad sound, or flaky web page) and briefly explain what the team did to try and resolve these issues. A project can still be great while having some remaining challenges to solve.
-
Feature table: (1-2 pages) Table of important product features
-
Example:
Description Host/Target Comp Code Author(s) Notes Web page T 5 JS / HTML Bert Based on As3 sample code Joystick T 4 C Bert, Ernie Works, but slow Buzzer T 2 C Big Bird Works in isolation, but not in full product Data Capture H 5 Python Oscar Generates graphs Cloud Data O 5 Python Snuffy Data published to Amazon Web Services ... ... ... ... ... ... - Required Columns:
- Description: briefly describe each feature in < ~15 words
- Host/Tagret: Is this on the H (host), T (target), or O (other platform; please explain in notes)
- Comp(leteness): rate the feature's completeness from 1 to 5; see list below for explanation of values
- Code: state the type(s) of code used to implement the feature (C, C++, Java, Perl, Script, systemd, ...). If multiple languages used then list % for each language.
- Author(s): Names of who made significant contributions to this component (>25% of work). [NEW]
- Notes: If not 100% your own code, state what you used of others'. Also if feature not 5/5 complete, explain what works or what is broken. Ex: "Does not detect new USB devices. 20% sample code, 80% us; cross compiled".
- Feature Completeness Number Guide:
- Pick the number best representing each feature (fractional OK, like 3.5).
- Feature 99+% completed and well tested. Feature works as desired almost all the time. Code is clean and fully integrated into the overall project. No (few) problems are known.
- Feature is mostly done and integrated into the overall project, but may lack some polish. Tested and works for normal cases but may fail on some unusual cases.
- Feature is partly complete and integrated into main project. It is usable, but only at a proof of concept level. May have many bugs, but still demonstrates it is a good workable idea and implementation. If given one more week to work on the project, the team could likely complete and fully test the feature (no extra time will be given, however!).
- Feature has a proof-of-concept implementation, but not integrated into the project. For example, have a program which can display to an LCD screen, but it has not been integrated into rest of project. Or, extensive research was done into the feature but it never worked out (explain work done in "note" section).
- Feature had some research or preliminary work done on it. No working code in project, or the code was scrapped because it really did not work as required. Group did not invest a large amount of time on the feature.
- No work done. It's not actually a feature, it's just a dream. So don't list it!
- Pick the number best representing each feature (fractional OK, like 3.5).
-
-
Extra Hardware & Software Used: (~1/2 page) Beyond the BeagleY-AI, Zen Hat, and the course's guides/notes, what hardware or software libraries did you use (if any)?
-
-
Code Submission (ZIP via CourSys):
- All your code.
- All your code.
Marking Support/Feedback
The following deliverable is to give each student peer feedback and to assist in grading each student. Generally, each student in a group will get a very similar mark; however, a student who is not an asset to his/her group may get as low as 0 on the project.
Individual Peer Review
Each group member submits their own self and peer review. High-quality comments are required and should be in the form of constructive feedback and supported by evidence. Students who do not submit this review may get a 5% penalty on their mark for the project.
The comments you submit about a group mates will be distributed to him/her, but the scores you assign are not. They will see the average of all the scores their group mates gave them.
Use the Peer feedback JSON generator to generate the JSON file to submit. Read the directions at the top of the tool.
Your comments should address the following elements:
- Team Contribution
- Did they contribute their fair share to the project?
If not, did they only do 75% of the expected work? 50%? 10%? - Were they easy to work with?
- Did they contribute their fair share to the project?
- Technical Skill
- Did the quality of their work meet your expectations?
- Did they do anything that impressed you?
- Communication
- Were they good at communicating with the group?
- How quickly did this person respond to messages?
- Were any difficulties resolved quickly?
- How can they improve?
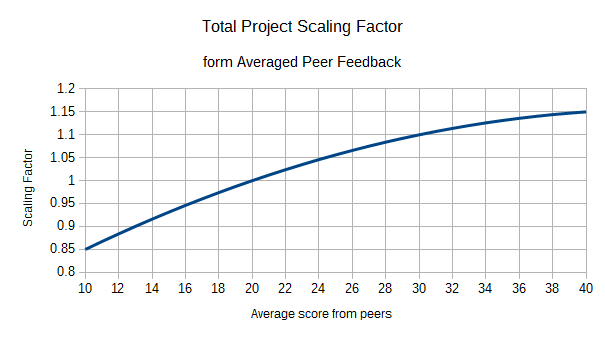
Scaling from Peer Feedback
In general, students will have their overall project mark scaled by between 0.85 (15% penalty) and 1.15 (15% bonus) in accordance with the following graph. This usually has a limited impact on most students' project grades, but does recognize some differences between individual contributions. Exceptional cases will be handled manually by the instructor in order to better ensure student contribution to the project is strongly reflected in individual student grades.
(Attempts to game the system with unfair evaluations will be handled manually, and unfavourably!)
- Let A be the average of all group member evaluations of you (excluding your evaluation of yourself).
- A is clamped to be between 10 ("half effort") and 40 ("double effort").
- A student's score on the entire project will be multiplied by the following weighting factor:
weight(A) = 0.65 + 0.0225A - 0.00025A2 - This formula gives the desired properties of A=10 gives a weight of 0.85; A=20 gives weight 1.0; A=40 gives weight 1.15.
- If you feel that extenuating circumstances apply to you, please submit that in the private notes section of your peer-review feedback (above).
- This approach is based on the work of Bill Gardner, and used by Ted Kirkpatrick.