Lab 4 - Heap Size with sbrk()
Prerequisite Skills for This Lab
- Know
sbrk()function. - Understand memory allocation from notes, see slides.
- C Skills
- Able to create and use structs.
- Able to use pointers: type cast, dereference, pointer arithmetic.
- Able to compile, run, and debug C programs.
Your task is...
More details listed in the Implement It! section.
In a file name lab4.c, write a program that does the following:
- Increase the heap size by 256 bytes.
- Use
sbrk()
- Use
- Into this new space, create two equal size memory blocks:
- Each block needs a header at the start of the block. The header structure should be:
struct header { unit64_t size; struct header* next; }; - Initialize the header of each block correctly.
- Initialize the data of the first block to 0's.
- Initialize the data of the second block to 1's.
- Each block needs a header at the start of the block. The header structure should be:
- Print out the following:
- Addresses of the blocks
- Values in block headers
- Contents of block data
Example output
first block: 0x55d90e61d000
second block: 0x55d90e61d080
first block size: 128
first block next: (nil)
second block size: 128
second block next: 0x55d90e61d000
0
...
0
1
...
1
1. Design (10 mins)
Design your solution.
- Plan your solution using pseudocode.
// Pseudocode idea: int main() { increase_heap_size(EXTRA_SIZE); initialize_block(first_block_pointer); initailize_block(second_block_pointer); // May want to print as you go for debugging print_out(...); } - Start by understanding the memory layout you will end up with.
- Draw a diagram of the memory layout.
-
Hint - Memory Layout Diagram Answer
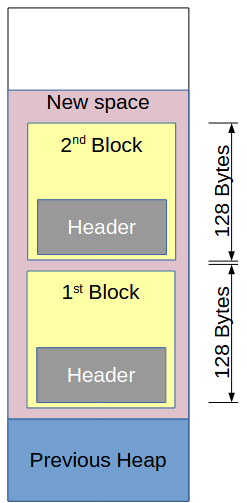
- For each step the lab requires, draw out what it looks like in your diagram.
- Include the fields of the header struct.
- Draw the pointers/addresses that you will to need.
- Plan where you'll get each piece of data, or how to calculate it.
- TA Design Discussion
- After ~10 minutes, the TAs will talk about the memory layout diagram and answer questions.
2. Implement it! (25 mins)
- Write a couple lines of code then compile, run, debug. Repeat!
- Help others around you!
- Do simplest thing first (call
sbrk()and print pointers). Then add functionality bit-by-bit.
- Increase the heap size by 256 bytes.
- Use
sbrk() -
Hint - Addresses
You will need to know the starting address of your new block of memory. How does the return value of sbrk() help you?
- Use
- Into this new space, create two equal size memory blocks:
- Each block needs a header at the start of the block. The header structure should be:
struct header { unit64_t size; struct header* next; }; - Create two memory blocks, each with a header.
- Make each block size 128 bytes (which includes the header).
-
Hint - "Create" a block
Since we are 100% controlling this little piece of memory, and it's already allocated to us, just directly write values into this memory area. -
Hint - Writing to Memory
If you know the address where you want to put a struct in memory that you control, use:struct header *my_block = (struct header *)start_address; -
Hint - Addresses
The address of the first block is the return value of sbrk(); the address of the second block is 128 bytes above that address. -
Hint - Block 2 address
If you know the address of the first block, you can just add the block size to the address to get the starting address of block 2. -
Hint - Pointer arithmetic
Adding 10 to a pointer of type (void*) moves 10 bytes later in memory. Adding 10 to a pointer of type (struct header*) moves 10 * sizeof(struct header)! So, you likely want to add 128 to the (void*) pointer you get from sbrk() vs to the (struct header*) pointer to the first block.
- Initialize header of each block correctly:
- The first block's
.nextshould beNULL. - The second block's
.nextshould point to the first block. - Set the size of each
.sizeto 128. -
Hint - Print as you go
Use the provide print function (below) to print out values as you go.
- The first block's
- Initialize the data of each block:
- The first block should be initialized to 0 (except for the header).
- The second block should be initialized to 1 (except for the header).
-
Hint - Header First
Print out the header pointers/values before initializing the block memory to 0 or 1. -
Hint - Print header after initializing
After you have initialized the blocks of memory to 0 or 1, print the header a 2nd time to verify you have not corrupted it. -
Hint - Set memory
Usememset()to fill some memory with a value. -
Hint - Sizes
Be careful computing how much memory to initialize. memset() takes the number of bytes of memory to fill.
- Each block needs a header at the start of the block. The header structure should be:
- Print out the following:
- The first block's (starting) address
- The second block's (starting) address
- The first block's
.size - The first block's
.next - The second block's
.size - The second block's
.next - Each byte from the first block (excluding the header)
- Each byte from the second block (excluding the header)
Printing Details
- Use
write()instead of`printf()or other similar functions use the heap. - OK if you get some pointer-cast warnings with the provided code or your own code.
- Use the following to print:
void print_out(char *format, void *data, size_t data_size) { char buf[BUF_SIZE]; ssize_t len = snprintf(buf, BUF_SIZE, format, data_size == sizeof(uint64_t) ? *(uint64_t *)data : *(void **)data); if (len < 0) { handle_error("snprintf"); } write(STDOUT_FILENO, buf, len); } - Example usage:
int waldo = 42;
print_out("Where is waldo? %p\n", &waldo, sizeof(&waldo));
3. Reviewing (10 mins)
- During the last 10 minutes of the in-person lab, TAs will show a sample solution.
- TAs will talk through how the solution works and discuss its implementation.
- Discussion Points
- How does it actually work?
- What is the memory layout?
- Where did each pointer come from?
- How does it handle errors?
- How does it cast values, and why?
- How does it actually work?
- Now that you have seen the solution:
- Finish implementing your solution: don't just copy the solution, but it is OK if you use the ideas you saw to help you finish.
- Revise your solution to improve it based on what you learned.
4. [Optional] Challenges
- Optional: Change your program to first read in from the user how many blocks to create, and then create and initialize those blocks.
- Optional: Write a function to traverse your linked list of blocks, printing out the starting address of that block's data (after the header).
Submission
Submit your C code to CourSys by Sunday midnight. The file name must be an exact match to what CourSys is expecting, otherwise it won't accept it. Remember you can submit up to 3 days late with no penalty if needed (but please plan to get it done on time to stay up to date on the course!)
Submissions will be marked for completion. It must be valid C code that runs (however we are unlikely to actually compile and run the code). You do not need to complete any optional steps.