Lab 9 - Image Processing
Directions for Labs
- Submit your completed lab file online to CourSys (not Canvas). Labs are marked on completion, not correctness, so complete each part to the best of your ability and learn!
- It is recommended that students attend in-person lab sections for lots of help!
- If you would like to attend an in-person lab section, you are welcome to come to any (or more than one) lab section.
- There is no need to attend the section you are enrolled in.
- There is no need to attend any lab sections: there is no attendance taken.
- You can complete the lab on your own time or own computer if you like.
- While completing these labs, you are encouraged to help your classmates and receive as much help as you like. Assignments, however, are individual work and you must not work with another person on assignments.
Part 1) Images: Load, Show & Size
- Inside your
cmpt120folder, create a new folder forlab9and make alab9.pyfile.- Into the
lab9folder, copy thecmpt120images.pymodule. - Into the
lab9folder, copy theimages/folder as created in the notes. Into this folder copy at least one of the sample images.
- Into the
- Create a program which loads an image, shows the image in a window, and then waits until the user presses escape.
- You'll need to call the following methods in the
cmpt120images.pymodule:get_image(),show_image(), andwait_for_escape(). - See the sample code in lecture for exactly how to do this.
- You'll need to call the following methods in the
- Find an new (small!)
.jpgimage online and save it to theimages/folder. Change your code to show this image.- Suggested source to find great (free!) photos: pexels.com
- Make sure the image is small (less than 1000 pixels in each dimension). On Pexels, click on the image you are interested in, then click the drop-down arrow beside "Free download" and select Small.
- If you use a large image, it will take a long time to load and show your image.
- Create a well-named function which is passed an image as an argument, and returns the image's width (number of columns).
-
Hint - len()
Use thelen()function. Recall you can uselen(img)orlen(img[0]). Decide which works and test it.
-
- Create a well-named function which is passed an image as an argument, and returns the image's height (number of rows).
- Print your new image's size to the screen, such as:
"Image size 960x800"
where width is listed before height.- Think about your image; do you have the width and height correct? Double check your logic.
- Add a comment above each of your width and height functions to explain why using the
len(...)function as you do correctly computes the answer.
Part 2) Add Boarder
- Create a well named function which is passed an image and changes the image to have a boarder all around it.
- Your function should change the pixel values of the image to be a new boarder colour if they are near the edge of the original image.
- Arguments:
- The image (the 2D array of pixels) to change
- The width of the boarder to add, such as
10(pixels) - The colour to make the new boarder. It will be a list of three values like
[50, 50, 100].
-
Hint - Nested loop:
Use a nested loop to iterate through all pixels of your image. -
Hint - Check if in boarder:
Inside your inner loop, decide if the current pixel is within the boarder area. If so, then set the current pixel to be equal to the colour that was passed in. If not, don't change it. -
Hint - In boarder:
You can check if a pixel is inside the boarder area by checking its row and column. If the row or column is less than the boarder width, it's in top or left side! If the row is greater than or equal to the image height minus boarder width then it 's in the bottom side! Similarly for the column and the image width and the right side. -
Hint - Functions:
Use your functions you created in part 1 to get the image width and height.
- Test out your code by passing the custom image you loaded in part 1 to this function and then showing the image. It should display with a boarder all around it.
-
Hint - Calling code:
Inside the main area of your program, you might call your function with some code such as:add_boarder_to_image(img, 10, [128, 128, 5])
-
- Try and clean up your code.
- You may find that your
ifstatement is long and hard to read if you are doing some complex checks about each pixel's row and column. Try creating some explanatory variables inside the inner most loop to clean it up. -
Hint - Suggested Variables:
Some suggested explanatory variables areis_top,is_left,is_bottom, andis_right. -
Hint - If Statement:
Yourifstatement then might become:if is_left or is_right or is_top or is_bottom:
- You may find that your
- Ensure that your Python file follows the following general layout:
- Brief comment at the top.
- Then all
importstatements. - Then all functions you are defining (
def). - Then all your "main" code section.
- It is important that you don't have code which is outside of functions placed in between your functions in your file, otherwise it is quite confusing to other programmers.
- All code that is not in a function should be after all the functions you declare (except possibly your Turtle from turtle graphics.)
Part 3) Gray Lined Background
- Copy into your
images/folder at least one image that has a green background (as done in lecture). - Load the green-background image in your code.
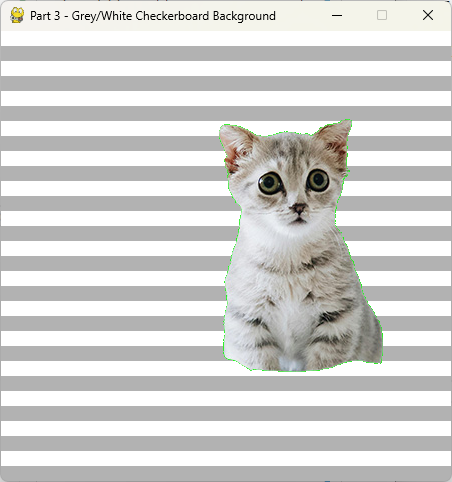
- Change the image so that all of its green pixels are replaced with alternating horizontal bands (wide lines) of gray and white.
- Make each band of white or gray be 15 pixels tall.
- For example:
- Green pixels in the first 15 rows (row 0-14) will be white,
- Green pixels in the next 15 rows (rows 15-29) will be gray,
- Green pixels in the next 15 rows (rows 30-44) will be white,
- Then gray, then white...
-
Hint - Compute rows:
Can you think how to alternate 15 rows at a time? What if you divided the row number by 15? That would map a row number to the index of the bands of gray-white. If you could compute the index number of the gray/white band, how could you use that to decide if it should be gray or white? (Try it by hand! Draw it on an image and think it through now, before looking at the next hint). Try writing "gray" and "white" on the alternating bands in an image on paper. What pattern do you notice about the index of the "gray" bands? How about the index of "white" bands? -
Hint - Divide:
To compute the gray/white band number, you'll need to divide the row number by 15. Investigate if you should use/or//. Try them! -
Hint - Gray vs White:
Once you have the band index (0, 1, 2, 3, 4, ...), notice that all the white ones are even index, and the gray ones are odd. Given an integer, how can you test if it's even or odd? Try coding it before revealing the next hint. -
Hint - Code:
You can decide the colour using an if statement like:if row // 15 % 2 == 0: # check if should be a white band
- Test your code.
- It should look similar to the following:

- It should look similar to the following:
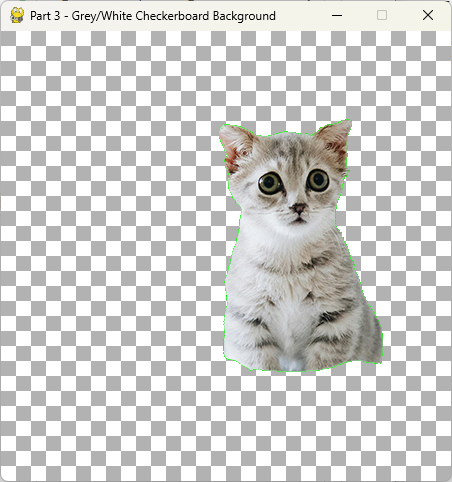
- [Optional]: Change your code to draw a 15-by-15 gray/white grid instead of bands.
-
Hint - Columns:
Use columns similar to how you used rows above. -
Hint - Alternate:
How can you make the columns alternate differently for the different rows? Try writing down the numbers and see a pattern. - Your image may look like this:

-
Part 4) Optional -- Black and White (Easy)
- Create a new function to turn your image black-and-white.
- For each pixel, compute the average of its red, green, and blue values.
- Set the red, green, and blue values for that pixel to be that average.
-
Hint - Average:
Compute the average with:avg = (r + g + b) // 3 -
Hint - Set Colour:
Set the colour of the current pixel using code like:img[row][col] = [avg, avg, avg]
- Display your black-and-white image! (Technically, it's grayscale).
Part 5) Optional -- Rainbow (Hard)
This part is all optional! Try it if you like.
- [Challenge 1]: Using Python code, create a rainbow image.
- You'll need to create a blank image to start with, so pick a size and then call the
cmpt120images.get_black_image(width, height)function. - Once you have the blank image, use loops to go through and set all the pixels to the values you want.
- You'll need to come up with a way to generate the colours of the rainbow.
- First start by coming up with bands across it and setting the colours correctly.
- You'll need to create a blank image to start with, so pick a size and then call the
- [Challenge 2]: Change your code to blend together adjacent rows to smoothly transition between the colours.
- [Challenge 3]: Change your code to draw the colours in an arc.
- Suggestion: Consider there to be a "centre" of the arcs you are drawing. Treat each pixel as a point on a graph with the arcs as circles emanating from a centre (possibly off the image). Compute which of the concentric circles that pixel would be in.
- Draw it on graph paper!
- Come show Dr. Brian! :)
Submission
Uncomment all your code before submitting.
Submit your lab9.py file to CourSys by Sunday midnight. Remember you can submit up to 3 days late with no penalty if needed (but please plan to get it done on time to stay up to date on the course!)
It's OK if your code shows multiple images one-after-the-next, or even asks the user to press escape multiple times. We are marking for completion, not correctness, so we're not running your code.
Topics Covered
- Basic image routines
- Load, Display, Save
- Wait until escape
- [Optional] Black image
- Get image width and height (functions)
- Custom image from the web
- Nested loop to process image
- Draw black frame (function)
- Change green to gray / white bands (or checker) (function)
- Colours
- [Optional] Convert an image from RGB to black-and-white
- [Optional] Build a rainbow
- Functions with images
- Pass image to functions to organize code.